This is a tutorial that explains the process of backing up a DVD on a PC using DVD Shrink. While there are many software solutions for backing up DVDs, the one on Windows I like is DVD Shrink. On Mac OS X, I like this DVD Copy for Mac.
that can copy DVD movie (D9 to D9, D5 to D5) with the entire movie in 1:1 ratio perfectly. This tutorial will be a concise explanation of how to backup DVD movie to DVD for free. There are many reasons to make a backup copy of DVDs one has purchased, keep reading to learn how to improve the quality of your re-encoded backups.
Step 1, download DVD Shrink
You can download DVD Shrink from: http://www.DVDshrink.org/.
For Mac users, you can download the DVD copy for Mac from here.
Step 2, Run DVD Shrink and insert your DVD movie into the DVD drive
The first thing you will need to do is open the disc. Click on "Open Disk" at the top-left of the program window. A small window will pop up. There is a drop down menu - select the drive and disk that you are going to backup. Then click OK. When you click OK, the DVD will be “analyzed”–this process will last for 1-3 minutes, then DVD Shrink will “suggest” a level of compression.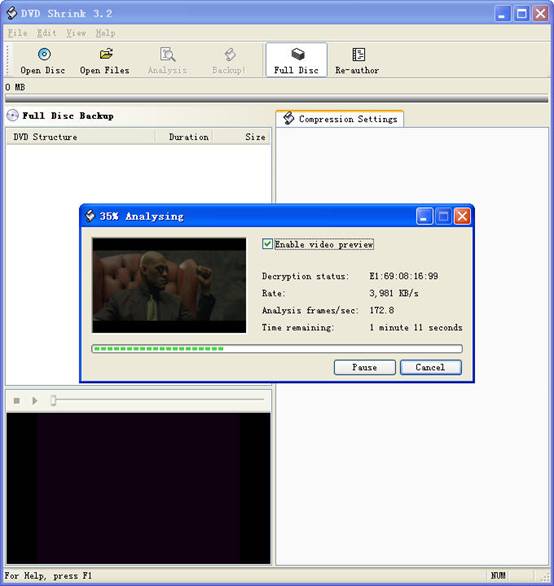
If you receive an error while trying to rip the DVD (like the one shown in the screenshot above), you will need to use another program such as DVD Decrypter to copy the DVD files off of the disc on to your hard drive. You need to minus the copy protections first. Click here to read how to use DVD decypher to minus the copy protections of DVD.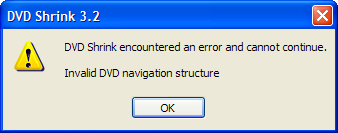
Step 3. Adjust compression for individual Titles (optional).
DVD Shrink will automatically select the highest possible quality settings that will fit on your disc. You could accept the settings that DVD Shrink chooses. You can also increase the quality of the main movie file by reducing or eliminating other video and audio files on the DVD.
Many modern DVDs will contain bonus footage, trailers, multiple surround sound modes, and other settings that one can reduce or eliminate to improve the quality of the main movie feature.
The main movie quality setting is reported to the left of a slider bar in the top right of the screen. In the screenshot below we see that the default setting requires that the main movie be compressed to 48.2% of its original level to fit on the disc. You can increase this percentage to improve the final quality of the backed-up DVD. But the output file will be larger.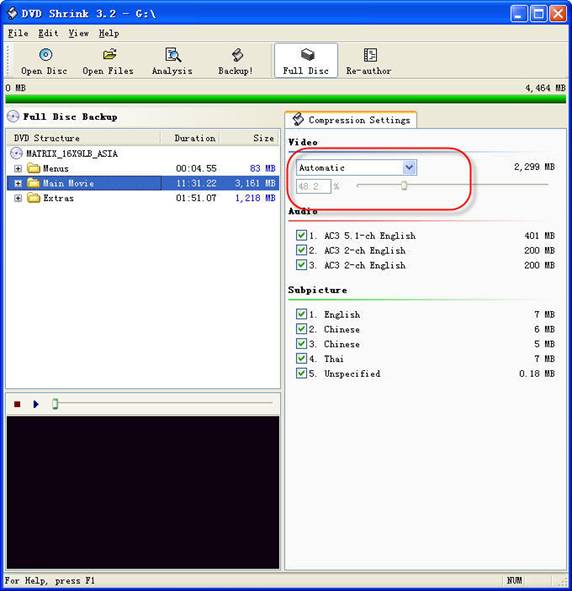
The way in which one goes about improving the quality of the main movie will be different depending on your specific needs. For example, when “Dolby Digital” and “DTS” 5.1 audio tracks are available, you can remove “DTS” (to save hundreds of megabytes), you can also choose to preserve “DTS” and reduce or eliminate other items from the DVD.
Some of the settings I made to this particular DVD were:
--Removed “5.1-ch French” audio track (went from 48.2% to 55.4% compression for main movie).
--Replaced certain Titles with “Still Image” (keep reading for more on this).
To improve the quality of the main movie, you'll need to reduce or eliminate other DVD features, each called a “Title” in DVD Shrink. Click the “plus sign” next to “Extras” in the menu to view the other titles.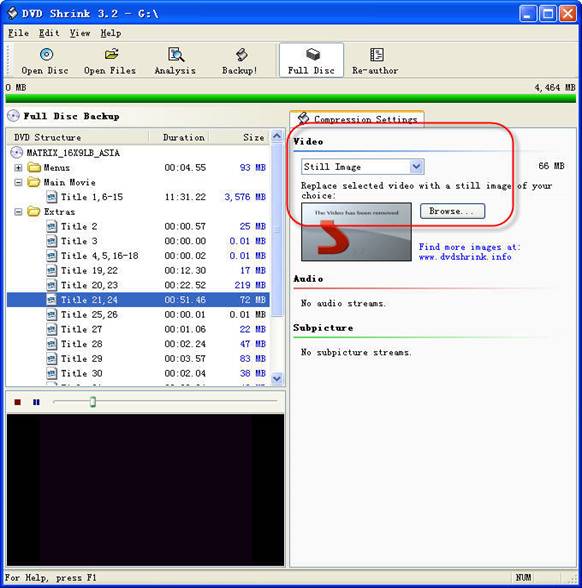
The Title I've selected below was 72MB. In this case the video was a “behind the scenes” feature that I did not wish to keep. Since one cannot completely remove any of the “Titles,” the next best thing is to replace them with a still image. In order to do this, select the title you want to replace, and choose “Still Image” from the drop-down menu in the top right. In this case the file went from 72MB to 66MB. The still image is configurable, simply drop an image of your own into the aptly named Still Images directory found under Program Files > DVD Shrink.
Step 4, Burn the re-encoded files to disc.
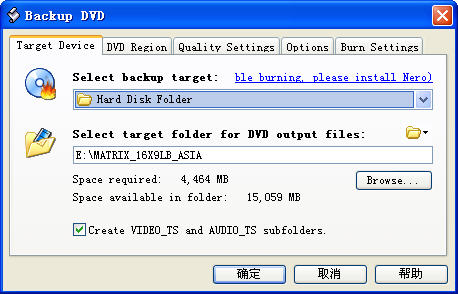
Click “Backup DVD” and Now select the folder where your temporary files will be saved. DVD Shrink needs to save a bunch of files on your computer (that actually compose your movie) so that it can burn that movie back onto another DVD. This is why you had to clear 5 gigs of space on your hard drive. Once the DVD backup has been burned, you can go ahead and delete these temporary files (the program does not do this itself).
You may as well select “Region Free” (default) under the DVD Region tab.
on the Burn Settings tab make sure “Maximum” burn speed is selected in the drop-down menu.
Once you have the settings the way you like them, begin the burn process. You'll see the “Encoding” happening first. There is a video preview that will show you where you are, but I believe that the encoding process goes slower with this setting enabled.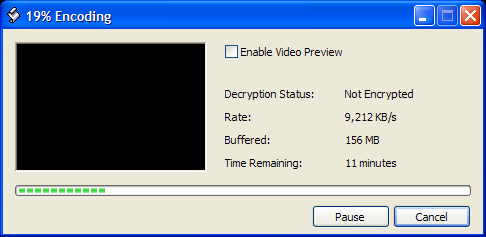
Once the files have been copied to your hard drive, your original DVD movie will eject from your computer.
You will also have a pop up asking you to put a blank DVD into the DVD burning drive of your computer that you previously selected.
Exchange the original DVD movie for a blank, burnable DVD. Push the blank DVD into the drive. DVD Shrink will begin burning the new DVD automatically in a few seconds. Now you will get a pop up that shows the progress while the program burns your new DVD movie. Once the new DVD has been burned, you will get a window that tells you that it's done. Click OK, close the program, and take your new DVD movie backup. All Done!
Note: DVD Shrink is only for PC users. If you are a Mac user, Please download DVD copy for Mac .