This powerful iPhone Transfer can help you to import songs/videos/images from your computer to iPhone. It can also backup your iPhone music/videos/images to your computer or external hard dirve. Most important, it can help you to put your DVD movies and videos/movies you download from internet and the format is not supported by iPhone to iPhone easily. It can also help you to make iPhone rigntones for iPhone users from video/dvd/music they have.
OK, only from what I said you may not fall in love with it immediately. Let's see how it works for you.
Part 1: How to Import DVD Movies/Videos/Songs/Images to iPhone
Step 1: Connect iPhone
Plug your iPhone to your computer via USB cable, it can automatically find your iPhone, load your iPhone info and show the info at the left of its interface. (It works the same as itunes.)

Step 2: Import to iPhone
A. Import DVD movies to iPhone (iTunes does not allow you to do this)
1.Select “Movie” in the left list and then click “PC to iPhone” button at the bottom of the interface, you will see a conversion and import window.
2.Put your DVD movies in your DVD Drive and Click “Load DVD” button to load the movies.
3.You can choose “Audio track” and “Subtitles” of the output movies, if you do not want a subtitle just leave it blank. You need also select the output profile and you can select apply to all button to use this output profile forever, if you do not use it some day, you can change it at will.
4.Click “Import” button and it will help you to convert the movies to iPhone video format and then import into your iPhone directly.
Note:
You need to check the box before “convert files before importing”, if not the movies/videos/songs can not be recognized by iPhone and can not be played in iPhone.
B. Import videos/songs to iPhone (iTunes only import certain format videos/songs to iPhone)
1. Select “Video” or “Music” in the left list and then click “PC to iPhone” button and go to the conversion and import window
2. Click “Add File” button to add the video or music to it and you can choose output profile and then click “import” button
Note:
If the videos and songs' format is not supported by iPhone, this powerful iPhone transfer will convert them first and then transfer them into your iPhone. If you have lots of videos or songs it may take longer to transfer them to your iPhone.
C. Import photo/images to iPhone
The process of importing images to iPhone is the same as videos/songs. First you need to select photo in the left list. Second you can select photos to import to your iPhone.

Note:
If you import a photo you do not want to you iPhone, you can right click the selected photo and then delete it from iPhone directly.
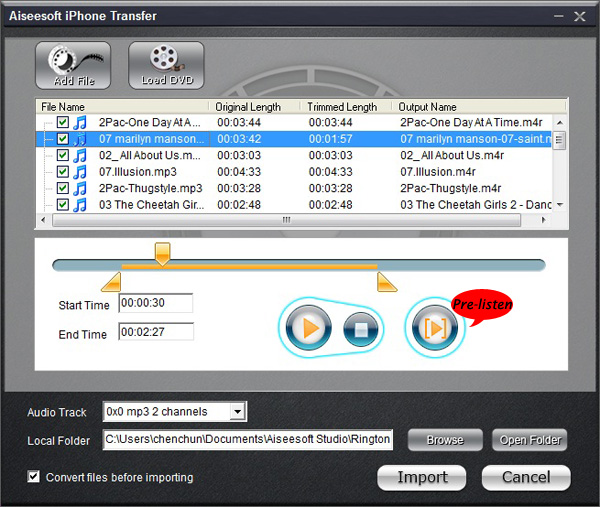
D. Import and Create Ringotnes to iPhone (iTunes can only import but not create)

1.Select Ringtone on the left list
2.Click “PC to iPhone” button and you will go to the make ringtone and import window.
3.Here this powerful iPhone transfer allows you to create ringtones for iPhone from DVD/Movie/Video/Music.
4.After you load a video, music or a DVD, you can pick up one part of it as your ringtone. You can pre-listen the ringtone. If not satisfied, change it and re-prelisten it.
5.After you find your right part as your ringtone, click “import” button. It will generate your ringtone and then import to your iPhone directly.
Part 2: How to Backup your iPhone Music/Images/Videos on Computer(iTunes does not allow you to do backup, NEVER!)
Run the software, and connect your iPhone/iPod to your computer via USB cable. After done, the iPhone/iPod icon and its library and playlists will appear in the Device list.
Step 1: Open the library/playlist that you want to export files, and then check the file(s) you want to export in the file list.
Step 2: Click “iPhone to PC” button to select the destination of the exporting files and start exporting files.
OK, you can throw away your itunes NOW!
If you are a Mac user, here are also a realy niceiPhone Transfer for Mac, it can do the same thing as the windows version.
Transfer DVD/Movies/Video/Songs/Images to your iPhone and backup Music, Video, Ringtones, and images to your Mac easily.
Also there is iPod Manager for Mac for Mac users. It has the same function as the iPhone transfer for mac.